Review and fix
Fix and confirm on the review screen
13 min read
This page was translated from Japanese by AI.
The parts of the screen
Section titled “The parts of the screen”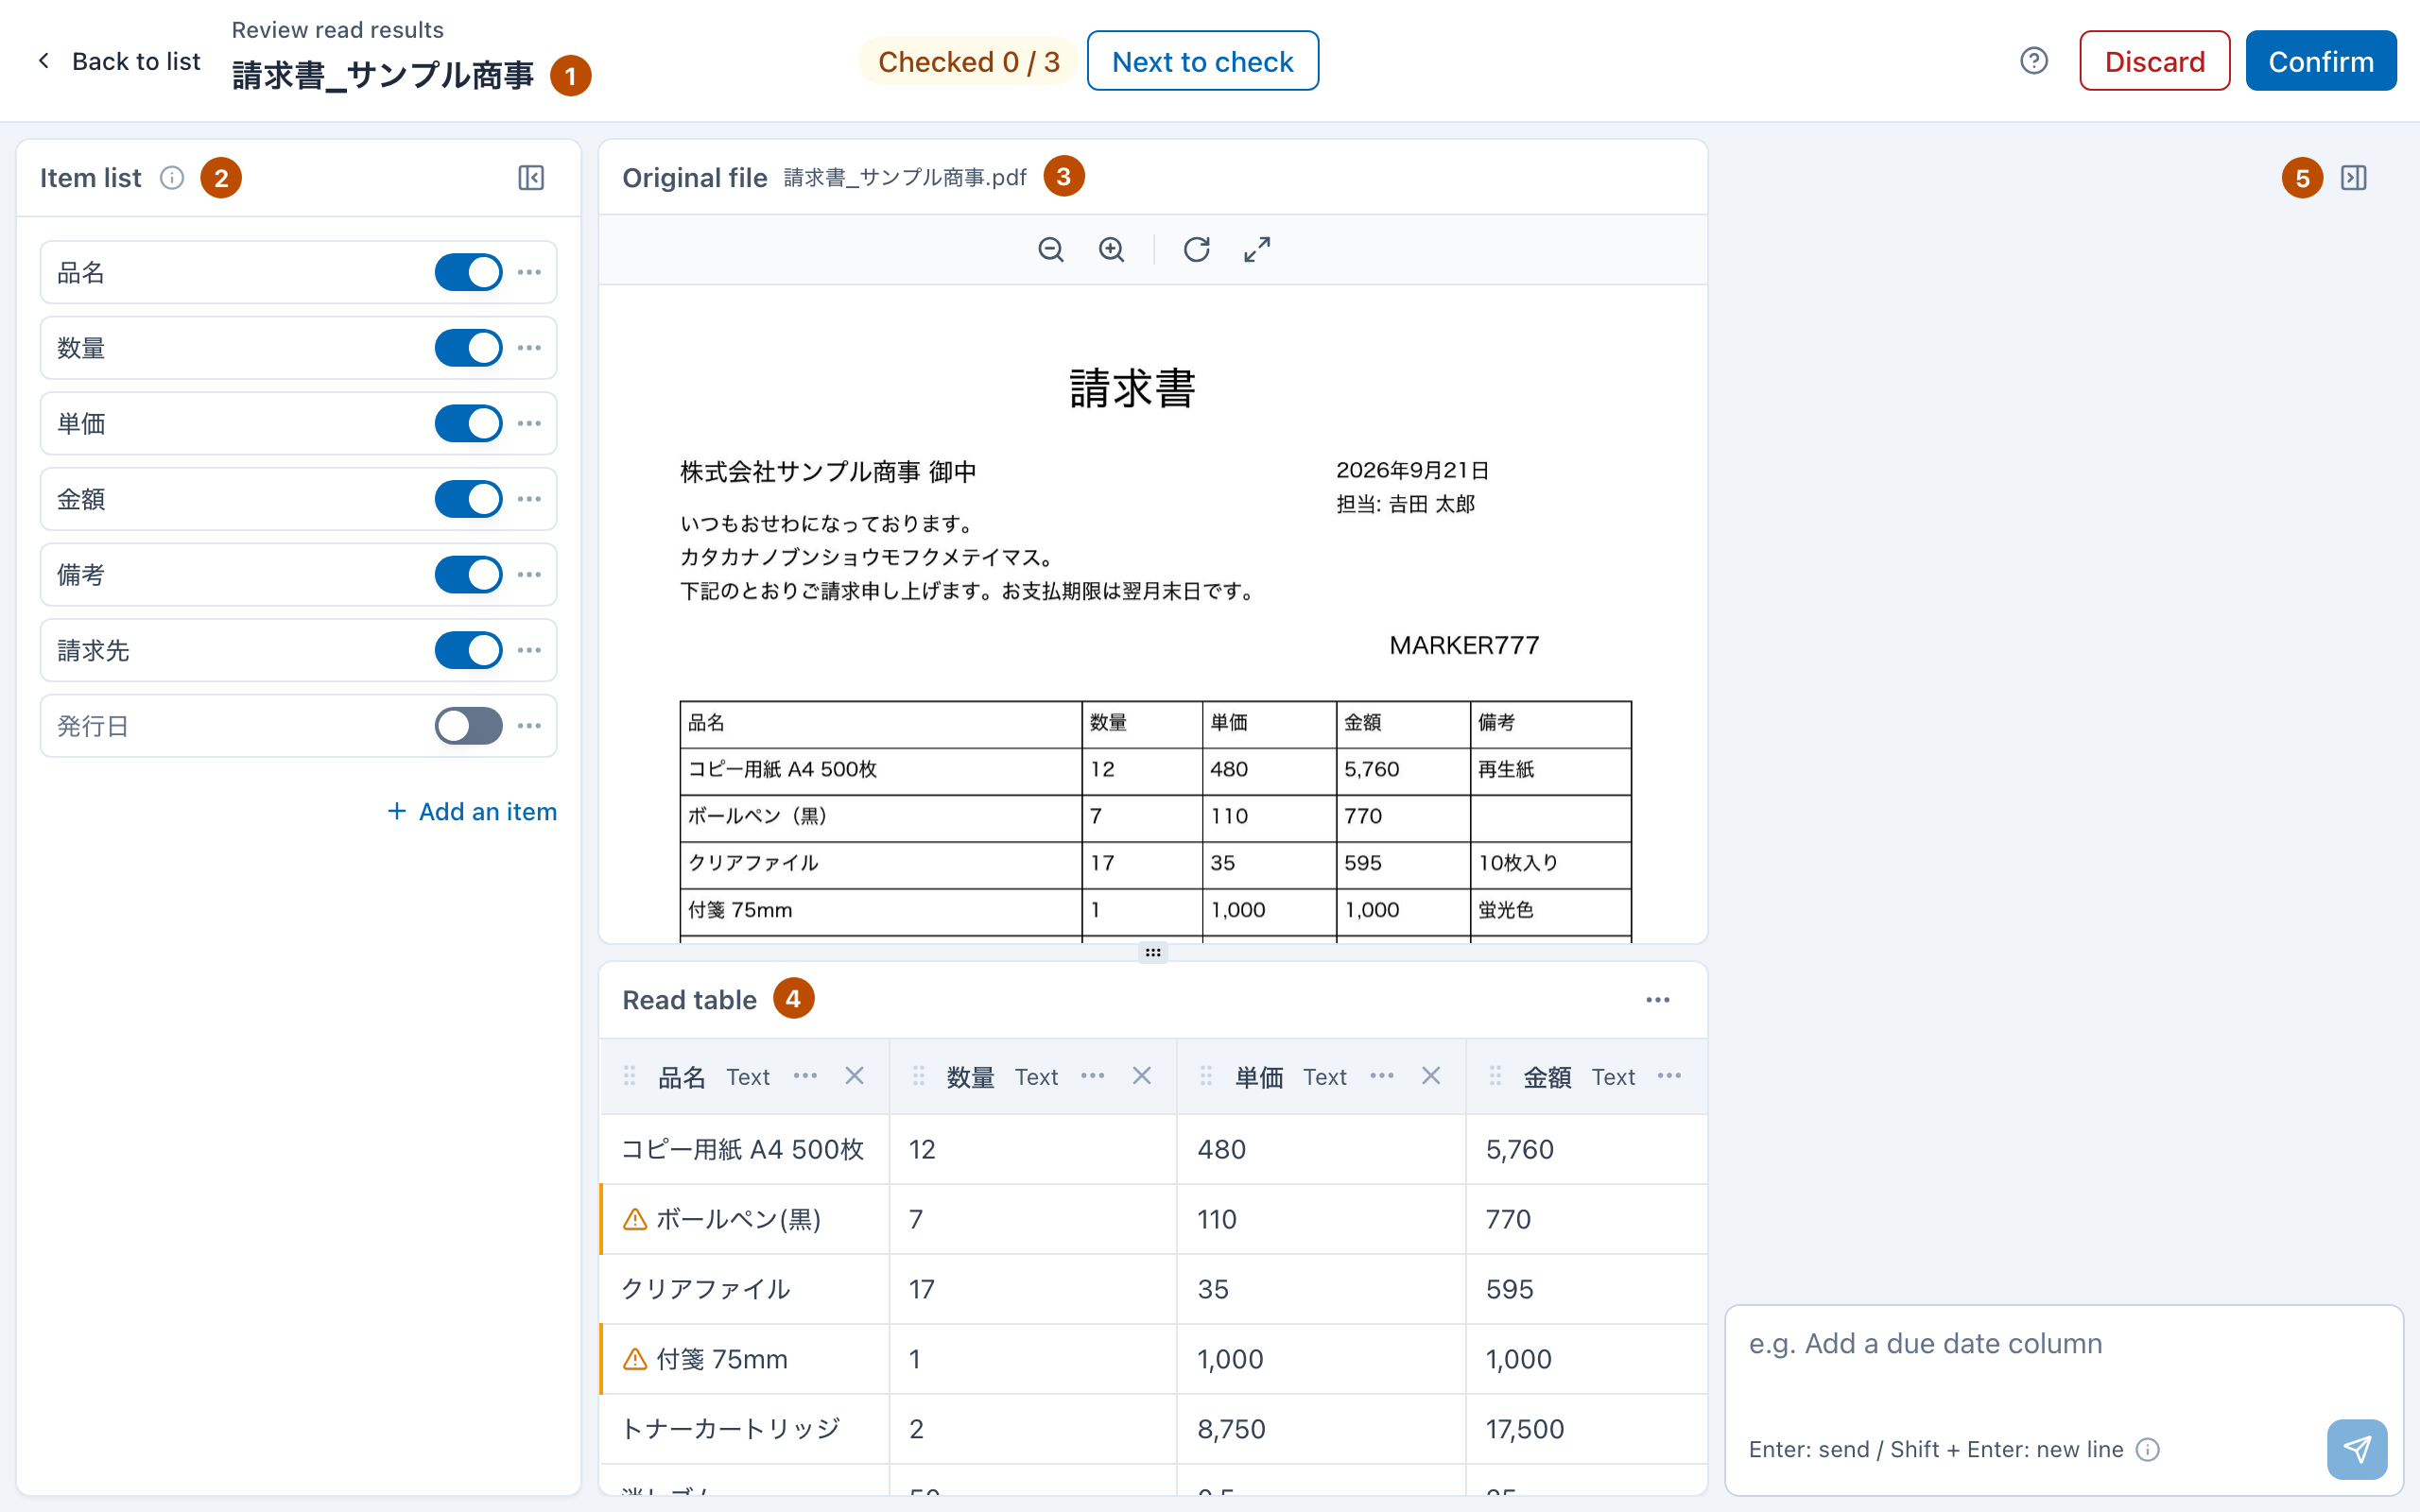
| Number | Area | What you can do |
|---|---|---|
| ① | Top bar | The name (the sheet name used when you confirm), the “Checked” count, “Next to check”, the ? button (“Open help”, which opens this page in a new tab), “Discard”, and “Confirm” |
| ② | Item list (left) | See and fix the values of the file shown in the original file, add items to the table or take them out, and add new items |
| ③ | Original file (upper middle) | See the PDF or image that was read. When you select a cell in the table or a value in the item list, the place of that value is marked. If the file is sideways, turn it 90° at a time with “Rotate right” (only how it looks changes, and it goes back to how it was when you open the review screen again). Press the original file to show it full screen and zoom in |
| ④ | Read table (lower middle) | Fix values, change item names and types, and remove items |
| ⑤ | Conversation with the AI (right) | Ask in words how to change the table |
You can collapse the item list with the button to the right of its heading, and the conversation with the AI with the button at its top right. A collapsed panel becomes a thin bar; press the bar to bring it back. Drag the border between the original file and the read table up or down to change the height of the table. On a wide screen, the height you set is used again the next time you open the review screen.
See values in the item list
Section titled “See values in the item list”The item list shows the values of the file shown in the original file, under the name of each item. Items whose switch on the right is on are in the table; faint items whose switch is off are not.
- When one file has only one row (for example, one invoice read as one row), every value is shown in the item list, including items that are not in the table. The read table shows the items in the table as one row. Fixing a value in either place changes the same value.
- When the line items are read one row each, values that appear once per document, such as the billing address or the total, are shown once in the item list. The read table repeats that value on every line item row (the sheet gets it the same way). A value you fix in the item list goes into every row of that file that held the same value.
- When several files were read together, the values change to those of the file you move to with < >. The read table shows the rows of all the files.
- When one file holds several documents, and for tables read without separating the line items, the item list shows no values; see them in the read table.
Like the cells of the table, pressing a value in the item list marks its place in the original file, and double-clicking it lets you fix it.
The item list is shown only on a wide screen. On a narrow screen, and while the item list is collapsed, see the values in the read table. On a narrow screen, press “Item list (N)” at the top right of the read table, and the items that are not in the table open from the bottom. Turn on an item’s switch to add it to the right end of the table.
Check flagged values
Section titled “Check flagged values”Values that the reading is not sure about, and values whose totals do not add up, get a mark (a triangle warning mark) in the table cell and in the item list. “Checked 0 / 3” in the top bar is how many of the marked values you have checked.
Only the values of items in the table are counted. Values of items that are not in the table are not counted, and “Next to check” does not move to them. When an item that is not in the table has a value that needs a check and is not shown in the item list, a dot appears next to its name. Add the item to the table to check it.
- Press “Next to check”. It moves to a marked value, and the matching place in the original file is marked. The read table also scrolls so that the cell of that value can be seen. When you read one file, it goes through the values shown in the item list first, and then the cells of the table. When you sent files together, it goes from the top row of the table down.
- Press a marked value to see the reason and a cutout of the original file.
- If the value is right, press “This value is correct”. If it is wrong, fix the “Value” box and press “Save corrected value”. Either way, the mark changes to a green check (“Checked”), and the reason for the next marked value opens.
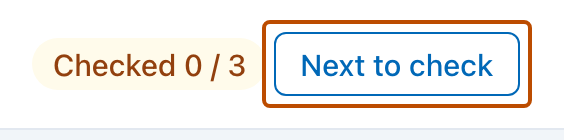
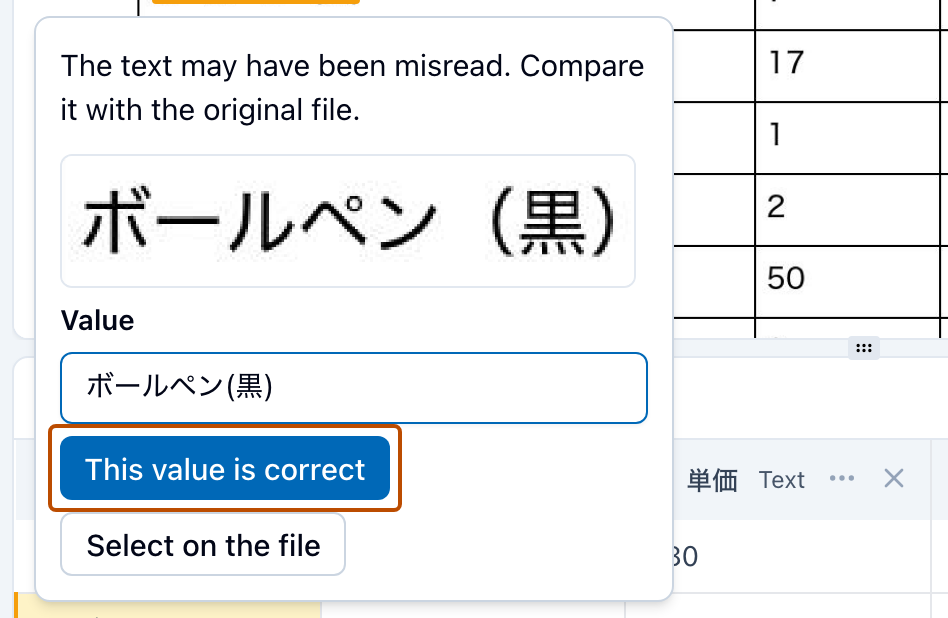
When you check a value without fixing it and the same item has other marked values that are the same, “Also mark 2 other matching values as checked” is shown. Press it to mark those values as checked too (the values do not change).
While a cell of the table or a value in the item list is selected, press Alt+↓ to go to the next value to check, and Alt+↑ to go to the previous one.
For a value that could be read in two ways, such as a handwritten number, the reason says “This value was read in two different ways. Compare it with the original file.” When the other reading is shown, as in “Another reading: 2025”, press “Use this reading” to replace the value with it.
In a document that was read with its page images as well, a value that was crossed out with a line or similar and written again is filled in with the new value and marked. When only part of the value was crossed out and rewritten, only that part is replaced (if 2016 in “2016年製×2本 2025年製×1本” is crossed out and 2026 is written above it, the value becomes “2026年製×2本 2025年製×1本”). Open the mark to see the crossed-out value. If reading also found other values, they are shown too.
- “Other candidate: 2025年製×1本”: another possible value, such as the value without the nearby writing. Press “Use this value” to enter it.
- “Crossed-out value: 2016年製×2本 2025年製×1本”: the value before it was crossed out. Press “Use this value” to enter it.
- A line such as “2026” in “備考” on row 1, and “2025年製×1本” here: shown only when the writing sits inside another empty cell. Press “Enter as shown” to enter each value into its cell and mark both as checked.
A value that was only crossed out, with nothing written in its place, leaves the cell empty and marked. To use the crossed-out value, press “Use this value”.
Fix a value
Section titled “Fix a value”- Double-click the cell or the value in the item list that you want to fix (you can also select it and press Enter or F2).
- Change the value and press Enter.
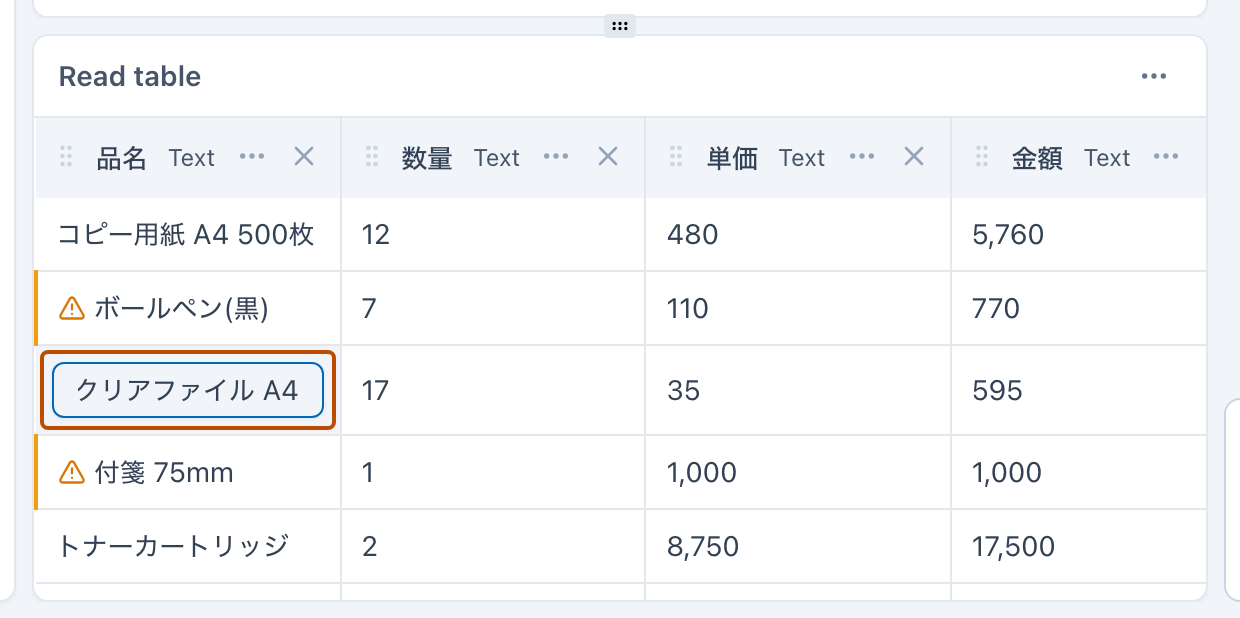
A value without a mark gets a gray check (“Edited”) when you fix it. For a marked value, fix it in the “Value” box that opens when you press it, and press “Save corrected value”; the mark changes to a green check (“Checked”). A value you have checked keeps its green check even if you fix it later.
When you fix a value in the “Value” box and the same item has other values that are the same as the value before your fix, “Also fix 3 other matching values” is shown. Press it to fix those values too (values you have checked or edited are not changed).
Select text on the original file to enter a value
Section titled “Select text on the original file to enter a value”Drag the mouse over the original file to select an area, and you can put the text in that area into the table.
- In the original file, drag to select the area around the text you want to enter.
- The text that was read is shown in “Selected text”. Fix it if it is wrong.
- In “Which item should this go into?”, press the item to put it in. To make a new item, press “Make a new item”, enter a name, and press “Make and put in”.
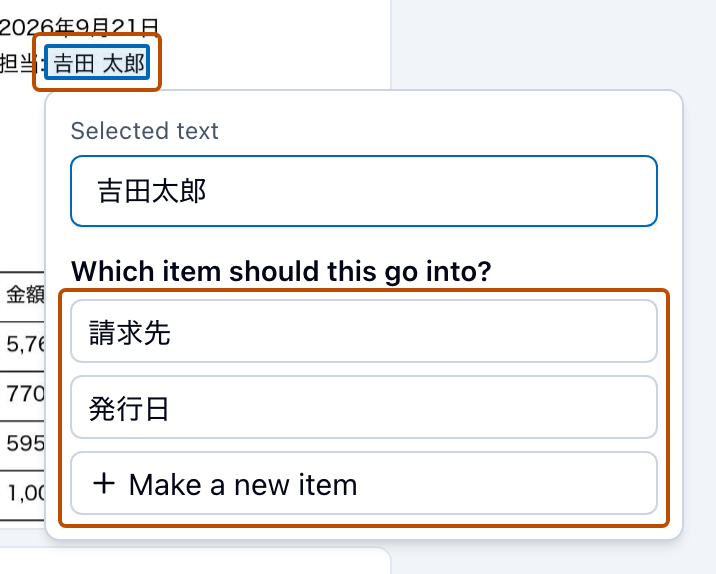
You can also select the value for a marked cell with “Select on the file” in that cell’s popup.
When you sent files together and make a new item from the text you selected, “Look for “(item name)” in the other 2 documents too? This counts as one chat message.” is shown. Press “Look for it” to look for the values of that item in the other files too and put them in.
You can select an area only on a wide screen with a mouse.
Change items
Section titled “Change items”You can do the following from an item’s heading. From the “…” of an item in the item list, you can use “Rename” and “See the values read” (which lists the values read, by file and by row), and for an item that is in the table, you can also change the type and tidy up. You can also take an item out of the table with its switch in the item list.
| What to do | How |
|---|---|
| Rename | Press the item name and change it |
| Change the type | Press the type to the right of the name (such as “Text”) and choose from “Text”, “Whole number”, “Decimal”, “Date”, “Date & time”, and “Yes / No” |
| Tidy | Press “…” and choose an option such as “Fill blanks with the value above”. You can also write a request in “Ask for another way to tidy…” |
| Remove from the table | Press × (in the item list, turn off the switch to the right of the item). A removed item stays faint in the “Item list” |
| Reorder | Drag the handle to the left of the name to the left or right |
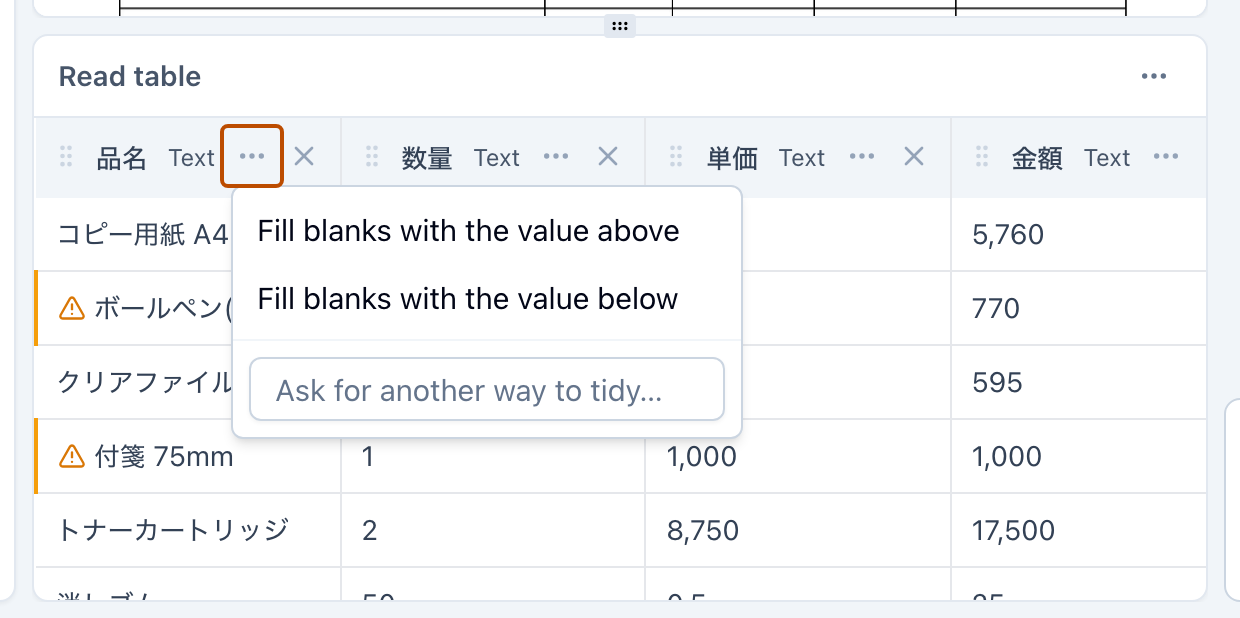
When you change the type to “Date” or “Whole number” and some values cannot be read as that type, a notice is shown. If you confirm without fixing them, they are saved as text.
Add an item
Section titled “Add an item”- Turn on the switch to the right of an item in the “Item list” to add it to the right end of the table.
- Press “Add an item”, enter a name, and press “Add” to make an empty item. Type values into the table, or select them on the original file.
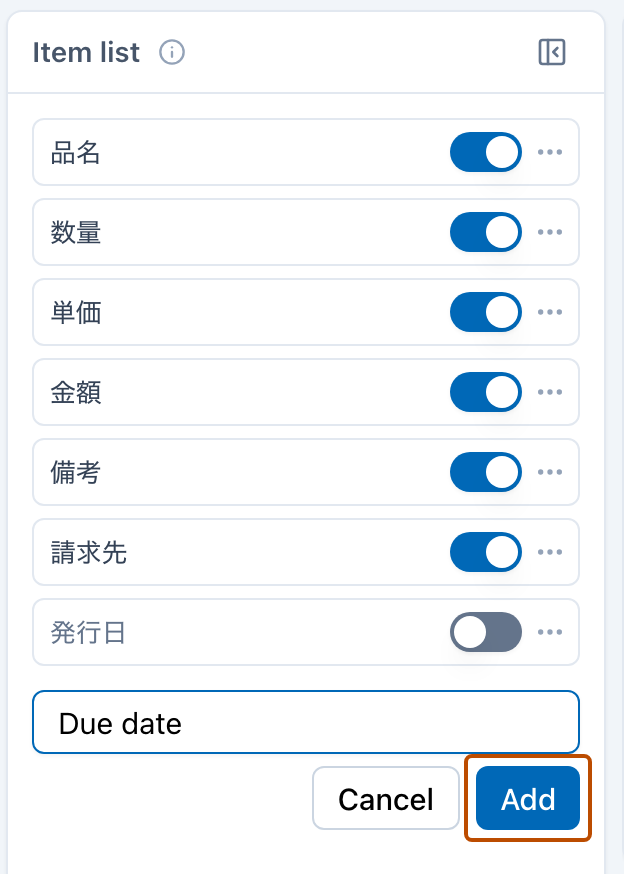
Ask AI to fix the table
Section titled “Ask AI to fix the table”In the input box of the conversation with the AI on the right, write how you want to change the table and send it (Enter sends it, Shift + Enter starts a new line). The ⓘ in the input box shows what you can and cannot do.
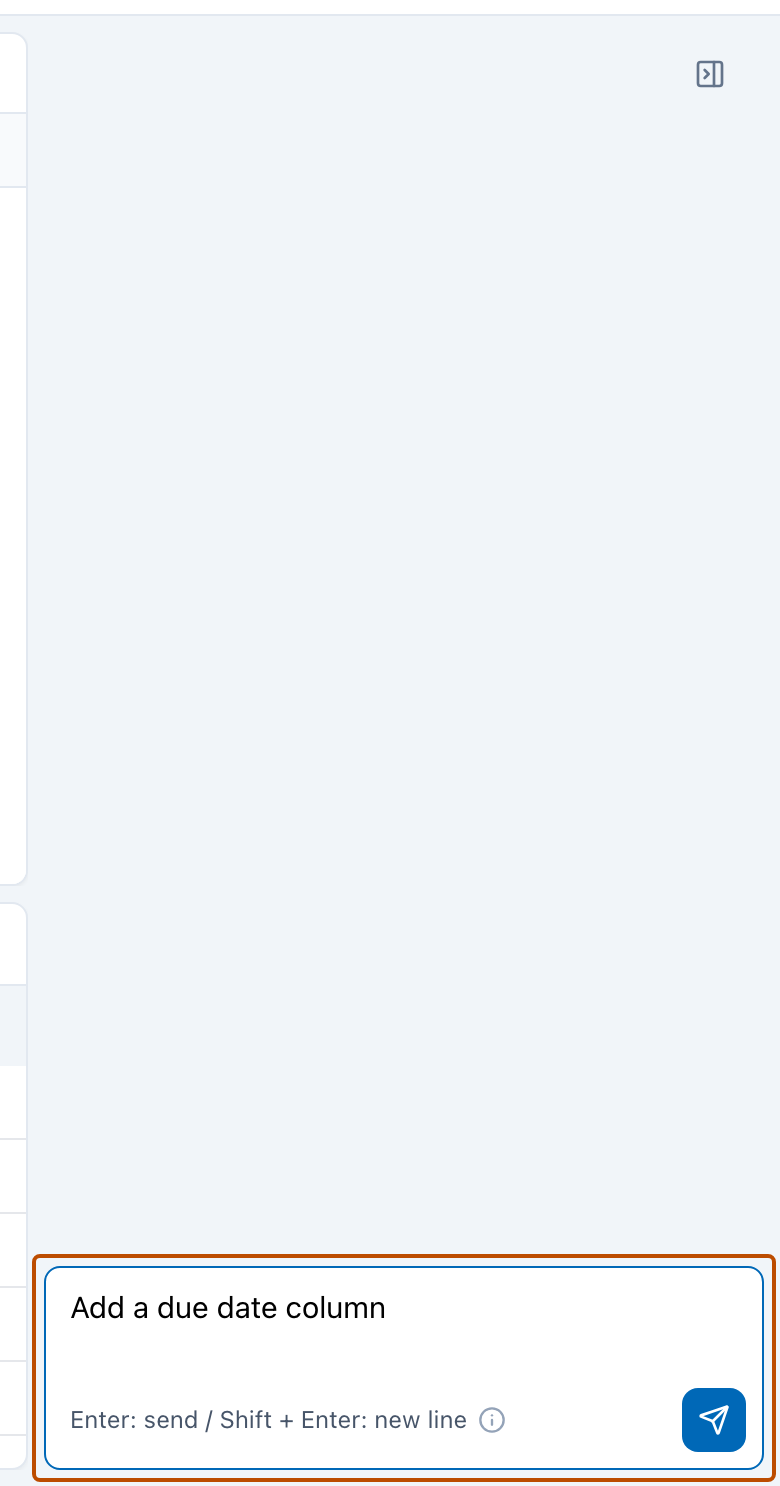
Examples: “Add a due date column”, “Make an amount column by multiplying quantity by unit price”
What you can do (examples):
- Add, remove, or rename columns
- Calculate (quantity × unit price, amounts including tax, and so on)
- Make dates use the same format
- Sort rows
- Keep only the rows that match a condition (filter)
What you cannot do:
- Change the look, such as cell colors, borders, or font size
- Merge cells
- Make a chart
- Add Excel formulas (you can add the calculated values)
- Sort across several documents (sorting is done per document)
- Bring in values from other sheets or files
The conversation with the AI has a usage limit for each plan. You can see how much you used this month in Usage.
Read an inspection sheet again
Section titled “Read an inspection sheet again”For the table of an inspection sheet (a form for writing down the results of inspecting equipment and the like), a request that cannot be done by changing the table (for example, “The inspection points are the tank names”) makes the pages of the original file be read again with your request attached. The table is rebuilt with the same fixed items, and cells whose values you changed by hand get your values back when a single matching row is found in the re-read table. If some cells could not be put back, the reply tells you how many. Cells you only checked are not put back, so check the values that were read again. From the second time on, your earlier requests to read again are attached as well. “Reset to initial” (Reset to the initial state) takes you back to the table right after reading, before it was read again.
When the sheet is read again, that counts toward the usage limit as one more use besides the message you sent.
Reset to the initial state
Section titled “Reset to the initial state”- Press the “…” at the top right of “Read table”.
- Press “Reset to initial”, and press “Reset”.
The table goes back to how it was right after reading. Your changes to the table and the conversation with the AI are also cleared.
Check files sent together
Section titled “Check files sent together”When you read several files together, the heading of the original file shows a number such as “1 / 3” and < >.
- Use < > to move between the files in the order you sent them.
- For a file that could not be read, open that file and press “Try again”, or confirm with only the files that were read.
- To take out a file you do not need, open that file and press “Remove”. The rows of that file disappear from the table. This cannot be undone.
When you send files together without a reading rule or a sample table, the AI first works out how to combine the files that were read into one table. While “Working out how to combine the documents. The table and chat are unavailable until it finishes.” is shown, just wait. If the AI asks you how to combine them, a table is shown for each file until you answer, and you cannot confirm. When you answer in the conversation with the AI, the files are combined into one table.
When documents are set apart from the others
Section titled “When documents are set apart from the others”If the files you sent together include a different kind of document, or a document with no fields in common with the others, that document is set apart. At the top of the review screen, a question such as “(file name) looks like a different kind compared with the other documents.” is shown, with “Read as a separate sheet” and “Leave out this time”.
- “Read as a separate sheet”: Makes a separate reading result from that document alone.
- “Leave out this time”: Takes the document out of this reading and throws it away. When asked to confirm, press “Leave out”. This cannot be undone. The pages used for reading are not given back.
If you confirm without answering, the document is not put in the table and stays in the Pending reads list.
A document read separately can be opened from the link in the notice at the top of the review screen. Press “Put back together” and then “Put together” to go back to the original single reading result, and the AI works out again how to combine the documents. Your fixes and the conversation with the AI are cleared, including those on the original reading result. Once any of the split reading results has been confirmed, they cannot be put back together.
Confirm as a sheet
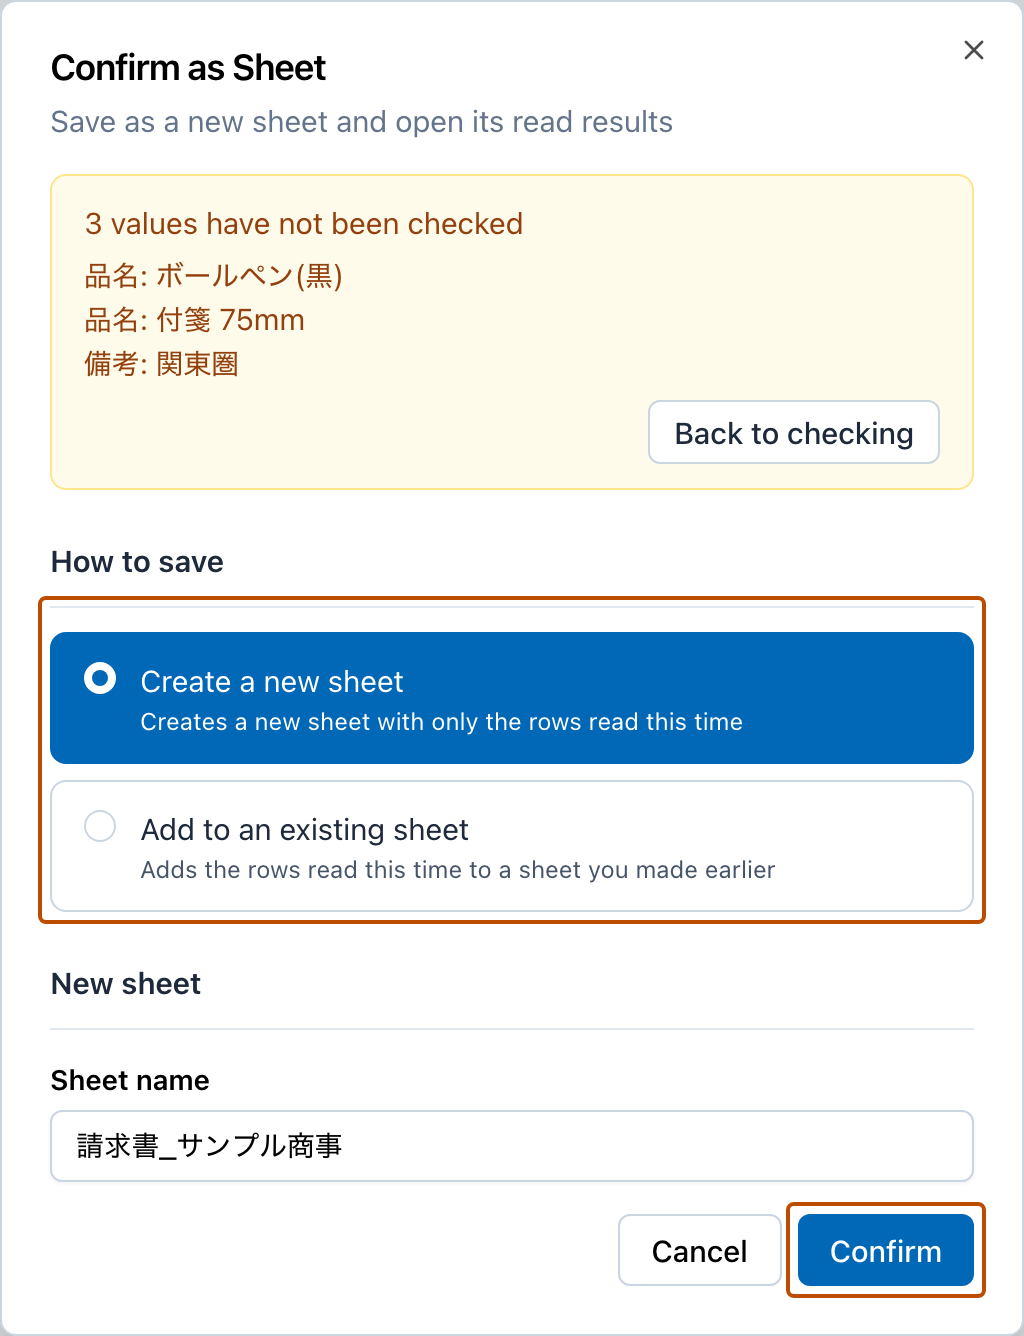
Section titled “Confirm as a sheet”- Press “Confirm” in the top bar.
- Choose “How to save”.
- “Create a new sheet”: Makes a new sheet with only the rows read this time. Check the “Sheet name”.
- “Add to an existing sheet”: Adds the rows read this time to a sheet you made before. Choose the “Sheet to add to” and check “Matching items”.
- If some values have not been checked yet, they are listed at the top of the dialog. To check them, press “Back to checking” to go to the first one. You can also confirm without checking them.
- Press “Confirm”.
- You are asked “Save this extraction as a rule?”. If you will read documents of the same layout again, enter a “Rule name” and press “Save”. Otherwise, press “Skip” (Reading rules). You are not asked when the documents were read with a saved rule.
- The confirmed sheet opens (Reading results).
After confirming, you cannot go back to the review screen to fix the reading.
Discard
Section titled “Discard”- Press “Discard” in the top bar.
- Press “Discard”.
A discarded reading result cannot be brought back. If you need it, upload the file again and read it.
Who can use the review screen
Section titled “Who can use the review screen”Editors and Admins can fix, confirm, and discard on the review screen (Members and roles).